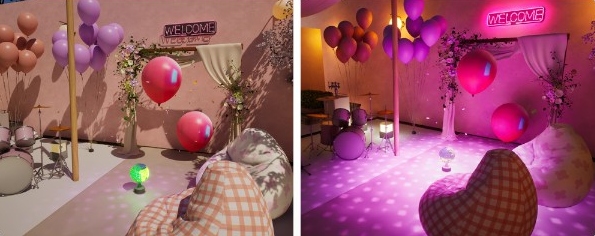
Build Studio: Difference between revisions
Created page with "{{see also|Build mode}} Welcome to the Build Studio, an unrestricted space for pure architectural creativity! Build Studio is a creative space free from any restrictions on furniture or presets. Freely use any material to bring your architectural visions to life! ==Basic Controls== === What is Build Studio? === Build Studio is a space dedicated solely to construction. From complex structures to detailed interiors, unleash your creativity to the fullest. Raise wall..." |
m Text replacement - "400px|right" to "350px|right" |
||
| (22 intermediate revisions by the same user not shown) | |||
| Line 1: | Line 1: | ||
{{see also|Build | {{stub}} | ||
Welcome to the Build Studio, an unrestricted space for pure architectural creativity! Build Studio is a creative space free from any restrictions on furniture or presets. Freely use any material to bring your architectural visions to life! | {{see also|Build Mode}} | ||
{{#ev:youtube|M-p8SNK9jg4|350px|right|Creative Studio Trailer}} | |||
Welcome to the [[Build Studio]], an unrestricted space for pure architectural creativity! Build Studio is a creative space free from any restrictions on [[furniture]] or [[presets]]. Freely use any material to bring your architectural visions to life! | |||
==Basic Controls== | ==Basic Controls== | ||
| Line 8: | Line 10: | ||
===Camera Control=== | ===Camera Control=== | ||
You can control your point of view using the '''mouse''' and '''[W]''', '''[A]''', '''[S]''', '''[D]''', '''[Q]''', '''[E]'''. | You can control your point of view using the '''mouse''' and '''[W]''', '''[A]''', '''[S]''', '''[D]''', '''[Q]''', '''[E]'''. | ||
* Move the camera forward, backward, left, and right using '''mouse click''' + '''drag''', '''[W]''', '''[A]''', '''[S]''', '''[D]''' | *Move the camera forward, backward, left, and right using '''mouse click''' + '''drag''', '''[W]''', '''[A]''', '''[S]''', '''[D]''' | ||
<nomobile>[[File:build_studio1.jpg|600px]]</nomobile><mobileonly>[[File:build_studio1.jpg|400px]]</mobileonly> | |||
Use '''[Q]''', '''[E]''' to move the camera up and down | |||
* Rotate the camera view using '''right mouse click''' + '''drag''' | * Rotate the camera view using '''right mouse click''' + '''drag''' | ||
<nomobile>[[File:build_studio2.jpg|600px]]</nomobile><mobileonly>[[File:build_studio2.jpg|400px]]</mobileonly> | |||
===View Floors=== | ===View Floors=== | ||
| Line 18: | Line 23: | ||
You can move to the floor you want and customize the interior and exterior as desired. | You can move to the floor you want and customize the interior and exterior as desired. | ||
<nomobile>[[File:build_studio3.jpg|600px]]</nomobile><mobileonly>[[File:build_studio3.jpg|400px]]</mobileonly> | |||
===Switch View Wall=== | ===Switch View Wall=== | ||
'''Wall Adjustment''': Click the icon or use the keyboard shortcuts '''[Home]''' and '''[End]''' to change how the walls are displayed. | '''Wall Adjustment''': Click the icon or use the keyboard shortcuts '''[Home]''' and '''[End]''' to change how the walls are displayed. | ||
| Line 23: | Line 29: | ||
*Choose the option that best suits your needs. | *Choose the option that best suits your needs. | ||
<nomobile>[[File:build_studio4.jpg|600px]]</nomobile><mobileonly>[[File:build_studio4.jpg|400px]]</mobileonly> | |||
===Photo Mode=== | ===Photo Mode=== | ||
Once you've completed your amazing structure, make sure to take a photo! | Once you've completed your amazing structure, make sure to take a photo! | ||
| Line 29: | Line 36: | ||
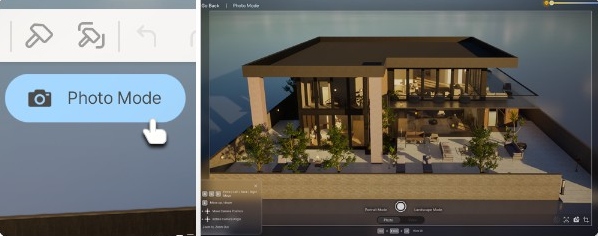
*To start Photo Mode, click the '''Photo Mode button''' at the top of the screen. | *To start Photo Mode, click the '''Photo Mode button''' at the top of the screen. | ||
<nomobile>[[File:build_studio5.jpg|600px]]</nomobile><mobileonly>[[File:build_studio5.jpg|400px]]</mobileonly> | |||
=== Upload Canvas === | === Upload Canvas === | ||
Show off your beautifully taken photos to other creators. | Show off your beautifully taken photos to other creators. | ||
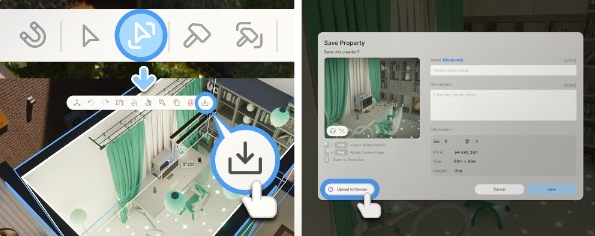
* Click the '''Save Lot Presets''' button or select a [[room]] with the room selection tool and save the lot and room with the '''Save Room Presets''' button. | * Click the '''Save Lot Presets''' button or select a [[room]] with the room selection tool and save the lot and room with the '''Save Room Presets''' button. | ||
<nomobile>[[File:build_studio6.jpg|600px]]</nomobile><mobileonly>[[File:build_studio6.jpg|400px]]</mobileonly> | |||
You can check the saved lots and rooms in the Build Presets tab. | You can check the saved lots and rooms in the Build Presets tab. | ||
* Click the '''Upload to Canvas button''' to upload the saved presets to the [[canvas]]. | * Click the '''Upload to Canvas button''' to upload the saved presets to the [[canvas]]. | ||
However, [[mannequins]], [[lighting]], and [[studio special effects]] cannot be saved or uploaded to the canvas. | *However, [[mannequins]], [[lighting]], and [[studio special effects]] cannot be saved or uploaded to the canvas. | ||
<nomobile>[[File:build_studio7.jpg|600px]]</nomobile><mobileonly>[[File:build_studio7.jpg|400px]]</mobileonly> | |||
==Build Guide== | ==Build Guide== | ||
===Basic Features=== | ===Basic Features=== | ||
| Line 42: | Line 54: | ||
You can purchase and place various [[structures]] and [[furniture]] needed for construction from the build list on the left. | You can purchase and place various [[structures]] and [[furniture]] needed for construction from the build list on the left. | ||
Use the search function to look for the furniture you want. | |||
From the menu at the top of the screen, you can access various [[building tools]] like moving between [[floors]], toggling the [[grid]], setting snap options, selecting and deleting [[rooms]], clearing all, and moving the entire [[plot]] and [[house]] to create stunning [[buildings]]. | |||
<nomobile>[[File:build_studio8.jpg|600px]]</nomobile><mobileonly>[[File:build_studio8.jpg|400px]]</mobileonly> | |||
===Building Presets=== | |||
In the '''Architecture Presets''' tab, you can select from the default [[presets]] provided. | |||
By using presets, you can easily create stunning buildings or rooms without having to build or decorate them yourself. | |||
<nomobile>[[File:build_studio9.jpg|600px]]</nomobile><mobileonly>[[File:build_studio9.jpg|400px]]</mobileonly> | |||
===Try Making It Yourself=== | |||
Do you want to build structures yourself? | |||
'''Structures''' tab contains the foundations of buildings, such as [[walls]], [[doors]], [[windows]], [[stairs]], and [[rooms]]. Install the desired structures to create impressive buildings. | |||
<nomobile>[[File:build_studio10.jpg|600px]]</nomobile><mobileonly>[[File:build_studio10.jpg|400px]]</mobileonly> | |||
<nomobile>[[File:build_studio11.jpg|600px]]</nomobile><mobileonly>[[File:build_studio11.jpg|400px]]</mobileonly> | |||
===Arranging Furniture=== | |||
If you've designed the [[exterior]] of the building, it's time to decorate the [[interior]], right? | |||
The '''Furniture''' tab offers an array of [[furniture]] [[items]]. | |||
<nomobile>[[File:build_studio12.jpg|600px]]</nomobile><mobileonly>[[File:build_studio12.jpg|400px]]</mobileonly> | |||
Arrange the furniture to suit your taste and make your home look amazing. | |||
===Customizing Furniture=== | |||
Clicking on the placed furniture and structures will bring up a variety of option menus. | |||
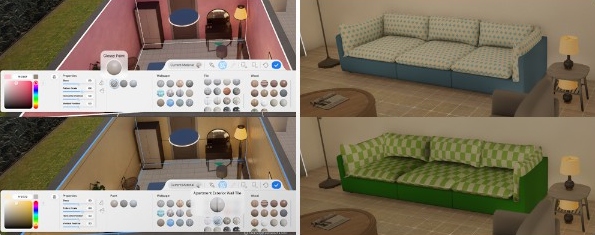
Click the '''Edit Colors and Materials''' button to apply different [[colors]] and [[textures]] to furniture and structures. | |||
*You can use the '''[[AI Texture]] Feature''' or import image files you have to use as textures. | |||
<nomobile>[[File:build_studio13.jpg|600px]]</nomobile><mobileonly>[[File:build_studio13.jpg|400px]]</mobileonly> | |||
===Try Creating Custom Furniture=== | |||
Would you like to create more diverse and unique furniture? | |||
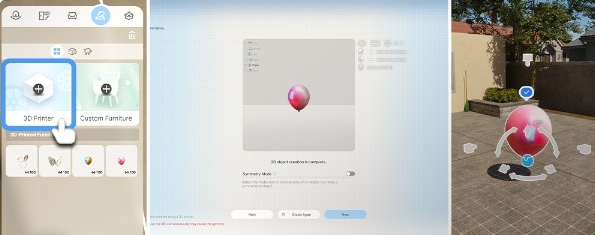
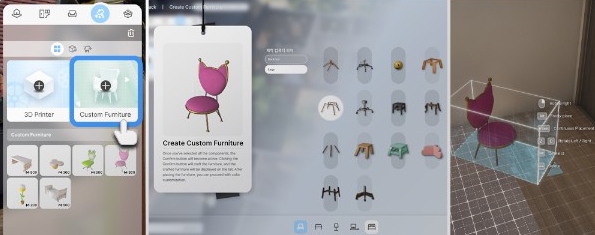
In the crafting tab, you can use the '''[[3D Printer]]''' and '''Furniture Creation''' features to design new furniture. | |||
<nomobile>[[File:build_studio14.jpg|600px]]</nomobile><mobileonly>[[File:build_studio14.jpg|400px]]</mobileonly> | |||
Reinvent your images into furniture using the 3D Printer. You'll be able to express beyond your imagination. | |||
<nomobile>[[File:build_studio15.jpg|600px]]</nomobile><mobileonly>[[File:build_studio15.jpg|400px]]</mobileonly> | |||
Click on '''Furniture Creation''' to combine parts as you like and create special furniture. | |||
=== | <nomobile>[[File:build_studio16.jpg|600px]]</nomobile><mobileonly>[[File:build_studio16.jpg|400px]]</mobileonly> | ||
===Use a Mannequin=== | |||
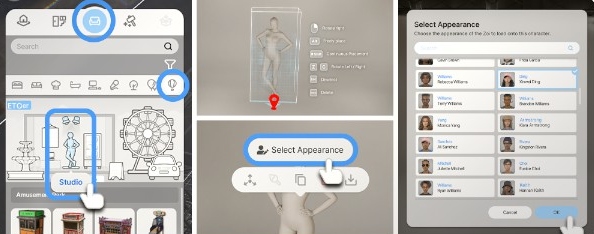
In the '''Furniture''' tab, click on the '''Miscellaneous''' category, then press the '''Studi'''o button with the [[mannequin]] and [[lights]] icon. | |||
<nomobile>[[File:build_studio17.jpg|600px]]</nomobile><mobileonly>[[File:build_studio17.jpg|400px]]</mobileonly> | |||
When you place a '''mannequin''', the '''Appearance''' Selection button will appear. Click the button to choose the desired appearance of [[Zoi]]. | |||
<nomobile>[[File:build_studio18.jpg|600px]]</nomobile><mobileonly>[[File:build_studio18.jpg|400px]]</mobileonly> | |||
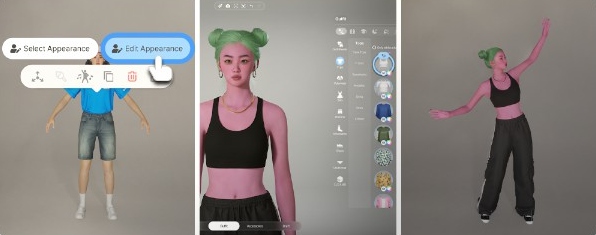
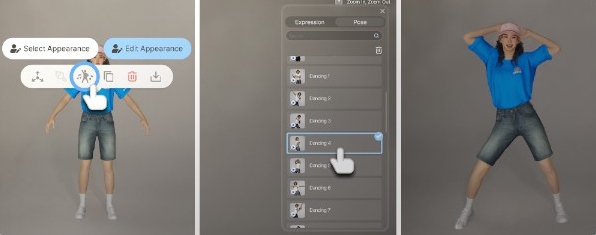
After clicking on the '''Pose and Expression''' icon, you can apply various poses and expressions to create diverse scenes. | |||
*However, mannequins, lights, and studio special effects '''cannot be saved or uploaded to the canvas'''. | |||
* | |||
<nomobile>[[File:build_studio19.jpg|600px]]</nomobile><mobileonly>[[File:build_studio19.jpg|400px]]</mobileonly> | |||
[[Category:Getting started]] [[Category:Features]] | [[Category:Getting started]] [[Category:Features]] | ||
Latest revision as of 04:58, 30 March 2025
- See also: Build Mode
Welcome to the Build Studio, an unrestricted space for pure architectural creativity! Build Studio is a creative space free from any restrictions on furniture or presets. Freely use any material to bring your architectural visions to life!
Basic Controls
What is Build Studio?
Build Studio is a space dedicated solely to construction. From complex structures to detailed interiors, unleash your creativity to the fullest. Raise walls, place doors and windows, arrange various materials of furniture and decorations, and design a beautiful garden.
Camera Control
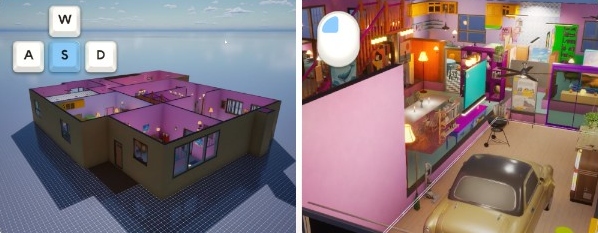
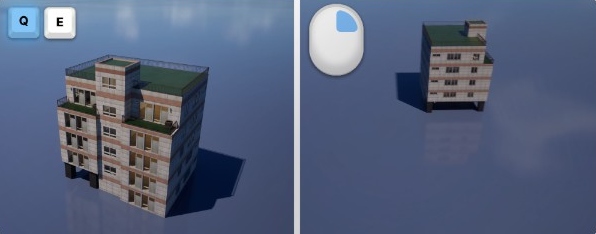
You can control your point of view using the mouse and [W], [A], [S], [D], [Q], [E].
- Move the camera forward, backward, left, and right using mouse click + drag, [W], [A], [S], [D]
Use [Q], [E] to move the camera up and down
- Rotate the camera view using right mouse click + drag
View Floors
Did you choose a building from the plot preset, but can only see one floor?
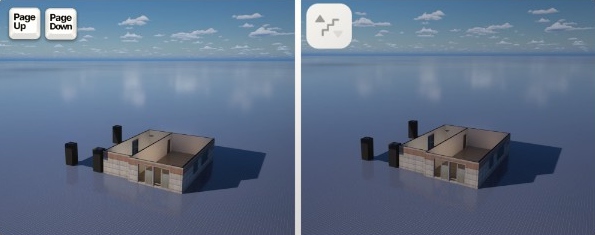
- Try clicking the Upper Floor button in the center at the top of the screen or press the keyboard shortcut [Page up]. You'll be able to see a building with multiple floors appear one by one.
- If you want to go back to the lower floors, click the Lower Floor button or press the keyboard shortcut [Page down].
You can move to the floor you want and customize the interior and exterior as desired.
Switch View Wall
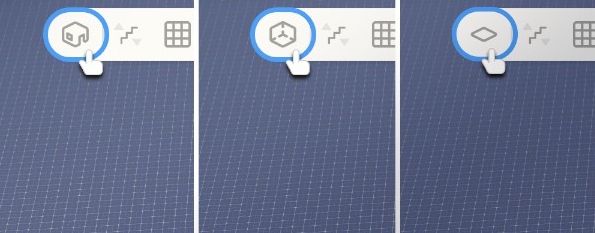
Wall Adjustment: Click the icon or use the keyboard shortcuts [Home] and [End] to change how the walls are displayed.
- You can make all the walls invisible, show only the exterior walls of the building, or display all walls.
- Choose the option that best suits your needs.
Photo Mode
Once you've completed your amazing structure, make sure to take a photo!
- Try out the photo feature Photo Mode!
With various camera options, you can capture your masterpiece as a treasured memory.
- To start Photo Mode, click the Photo Mode button at the top of the screen.
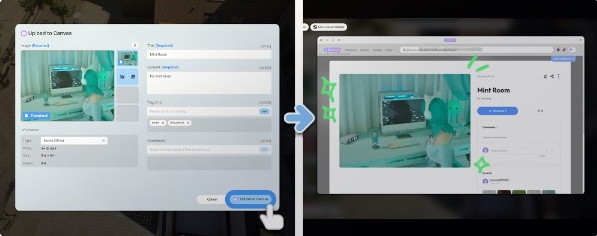
Upload Canvas
Show off your beautifully taken photos to other creators.
- Click the Save Lot Presets button or select a room with the room selection tool and save the lot and room with the Save Room Presets button.
You can check the saved lots and rooms in the Build Presets tab.
- Click the Upload to Canvas button to upload the saved presets to the canvas.
- However, mannequins, lighting, and studio special effects cannot be saved or uploaded to the canvas.
Build Guide
Basic Features
Shall we start building?
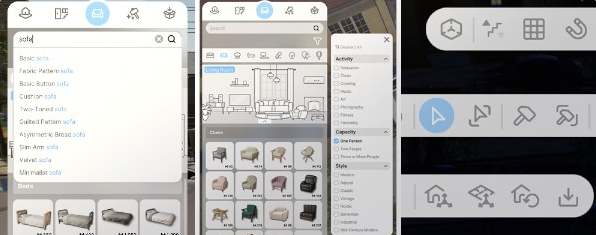
You can purchase and place various structures and furniture needed for construction from the build list on the left.
Use the search function to look for the furniture you want.
From the menu at the top of the screen, you can access various building tools like moving between floors, toggling the grid, setting snap options, selecting and deleting rooms, clearing all, and moving the entire plot and house to create stunning buildings.
Building Presets
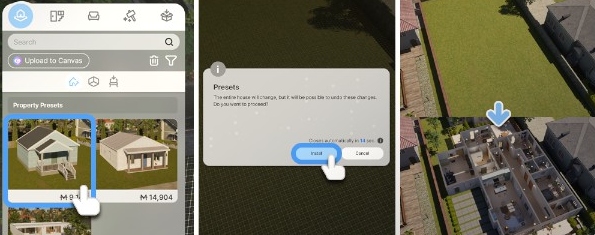
In the Architecture Presets tab, you can select from the default presets provided.
By using presets, you can easily create stunning buildings or rooms without having to build or decorate them yourself.
Try Making It Yourself
Do you want to build structures yourself?
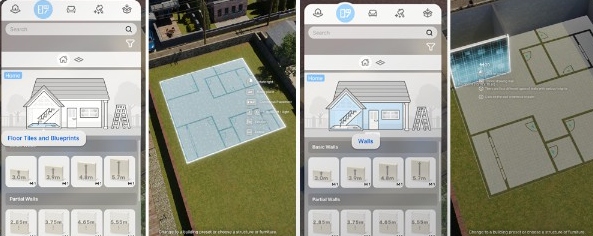
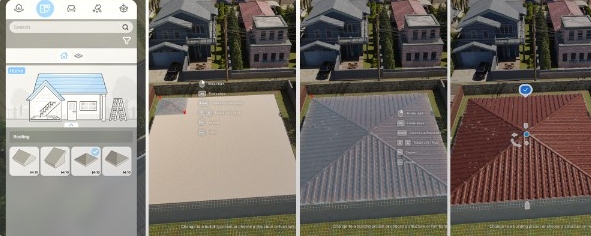
Structures tab contains the foundations of buildings, such as walls, doors, windows, stairs, and rooms. Install the desired structures to create impressive buildings.
Arranging Furniture
If you've designed the exterior of the building, it's time to decorate the interior, right?
The Furniture tab offers an array of furniture items.
Arrange the furniture to suit your taste and make your home look amazing.
Customizing Furniture
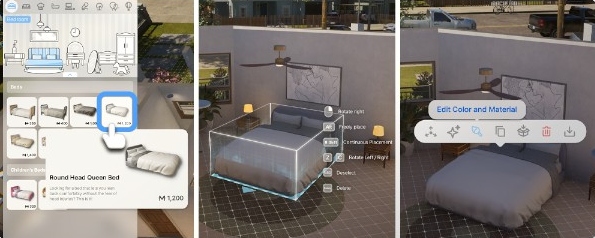
Clicking on the placed furniture and structures will bring up a variety of option menus.
Click the Edit Colors and Materials button to apply different colors and textures to furniture and structures.
- You can use the AI Texture Feature or import image files you have to use as textures.
Try Creating Custom Furniture
Would you like to create more diverse and unique furniture?
In the crafting tab, you can use the 3D Printer and Furniture Creation features to design new furniture.
Reinvent your images into furniture using the 3D Printer. You'll be able to express beyond your imagination.
Click on Furniture Creation to combine parts as you like and create special furniture.
Use a Mannequin
In the Furniture tab, click on the Miscellaneous category, then press the Studio button with the mannequin and lights icon.
When you place a mannequin, the Appearance Selection button will appear. Click the button to choose the desired appearance of Zoi.
After clicking on the Pose and Expression icon, you can apply various poses and expressions to create diverse scenes.
- However, mannequins, lights, and studio special effects cannot be saved or uploaded to the canvas.
